Wednesday, April 11, 2018

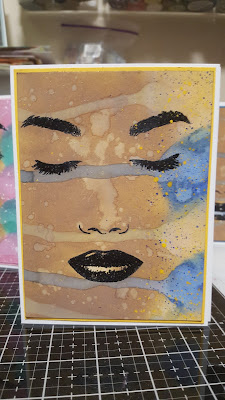
'Sistah Sorros' FACE Cards


Happy Hump Day Everyone:

With the exception of adding a acrylic paint, today's cards are just a neat spend on the cards I shared with you yesterday. You may have noticed, I have not decided what greeting/sentiment I want to put on the front of the cards. Still pondering. Take a look [anyway] and share your thoughts.

Each card represents an African-American Greek sorority.


Zeta Phi Beta


Sigma Gamma Rho


Alpha Kappa Alpha


Delta sigma Theta


Thanks for stopping by The Peddler's Gallery, and come back real soon.


Tuesday, April 10, 2018

FACE Cards

Happy Hellos Everyone!!!!

Let me just say, 'The Peddler' was busy at work this weekend. I thoroughly enjoyed bringing these ladies to life. Take a look and tell me what you think. Also, tune in later to see the special spend I used to create a card for my 'Sistah Sorros.'
So much went into each one of these cards.
To begin, each stamp image was stamped with embossing ink by Ranger Ink
 and embossed with black detail embossing powder. That took a minute (smiles)


Although I did not use them all, I pulled out every distress ink
 pad by Tim Holtz I own and I went for it.


When using distress in inks, my goal is often seems to be--create an artistic
 backdrop. There was no difference with this card. I tried to bring the back-
ground to the forefront of her face by adding a little moisture to her face. This
 technique also represented several shades of color.


 Additional hues and moisture were added
 and allowed to drizzle across the paper.


Lastly, a sentiment was added and the card was topped-off with a shimmering mist.
As always, thanks for stopping by The Peddler's Gallery and come back real soon.


Wednesday, April 4, 2018

Shake-It Up

Happy Hellos Everyone!


I hope you have manage to tackled the "Hump" in your Hump Day. I also you enjoyed yesterday's card. Hopefully, you will find today's card just as nice. Today's card is the perfect card to bring along to the celebration.


I absolutely loved how this shaker greeting
 card turned out. I found it much easier to
create than using the traditional method--
building a wall of foam tape.


Instead of foam tape, I elected to use my new [purple handle] fuse tool.


I wanted to use a stitched rectangle die, but I do not own one, so I use a
 rectangle dies with an etched edge.


As you can see, I began to have a goodtime with creating this style shaker card.
 I decided to create as many as I could using as many colors that were available to me.


As always, thanks for stopping by The Peddler's Gallery and be sure to come back real soon.


Tuesday, April 3, 2018

Faux Water & Oxide Backgrounds

Happy Hellos Everyone!

I  hope you enjoyed a wonderful Easter weekend. My holiday began with a bump or or two and ended in a bit of a swirl. However it was a fantastic weekend. As I mentioned in the previous post, I am just all about the oxidize inks and today's post is a mixture of oxidize inks and Copic Markers. Take a look and tell me what you think.


 This is a perfect card to encourage or congratulate that special person in your life. I had so much fun creating the background for this greeting card. 

!
The use of faux water provided texture and did not blight the hues.

Applying additional texture, I outlined the whale with Nuvo.

I found this neat stamp set by Ranger Ink. I loved it enough to take time to emboss it in dark purple embossingpowder. 

I cast a little light on my whale as if it surfaced to the top of the ocean and accented the eye with Nuvo.


Just a closer look at my whale waving goodbye. 

As always, thanks for stopping by The Peddler's Gallery and be sure to comeback real soon.


Friday, March 30, 2018

Saying, "Sorry" With a Smile


Happy Hellos Everyone:

I hope your weekend has kicked-off on a fantastic start.

Last year was not a high producing year for me when it came to creating my handcrafted greeting cards. It appeared as though I had more interest in creating my keepsake boxes. Often times the mojo just was not there for producing cards. I'm not sure why. People were still having birthdays, getting married, and celebrating throughout the year, but what a difference a year makes. I have produced over 100 cards since the end of January. All I can say is, "WOW!"

I have totally fallen head over heels for Tim Holtz Oxide Inks and it shows in several of my cards. Today's card is not without exception.


I think I have half of Tim's palette on this 
card. As you can see, I have used an array
of hues on this card. I manipulated the 
various colors apply it with sponge 
applicators and water.


I used one of my wafer dies from Simon Says
and adhered it to a parchment paper die cut 
circle and applied it to the card.


 Prior to applying the oxidize ink, I stamped and embossed a background stamp
 from Simon Says.


I embossed the sentiment in gold.


I also applied a thin layer of fun foam in between the front and the card base.


Thanks for stopping by The Peddler's Gallery and come back again real soon.


Thursday, March 29, 2018

Take Care

Happy Hellos Everyone!

I hope all is well with you. Lets get right in to today's card. I think it is the perfect card to send to that special person who is feeling a little under the weather or that could use a break. I truly believe this would be a way to brighten their day.


I used one of my favorite stamp and die
 set from one of  my favorite places to shop for
 all things papercraft...Papertrey Inc. I learned
 quickly. There are so many ways to adorn this tea mug 

With this set, you are able to created your
 embellishments. The faux teabag tag provides
 the additional attention to detail.


As you can see, the cup was not completely
 cutout. It probably would have been a lot
 easier to cut two cup panels. I'm not certain why
 I like creating extra work for myself;
 however, I have to say, 'I love the out come.'


The cards are covered in beautiful gold trimmed emboss floral paper.


I hope you like this card. If so, leave me a comment and as always, thanks for stopping by 
The Peddler's Gallery.


Wednesday, March 28, 2018

For A Friend

Happy Hellos Everyone!

I know it has been over a year since my last post. So much has happened and things continue to happen.  I think that thing is what many refer to as life. LOL! I can say I have been at my craft table working hard at creating all sorts of things and I can hardly wait to share them with you. Over the past six weeks, I have created more than 100 cards. I am convinced I must have bumped my head. LOL! Now, you know, that's not true, but I can honestly say I having lots of fun. Today's card was no different.


 Lately, for me, it has been all about
 Tim Holtz and his Oxide inks. I
 used three of his Oxide inks and achieve
 four to five hues to create this ombre
background effect.


I completed my background by applying
 white embossing powder to an image I
discovered at Simon Says.


I also added a mist of glitter to achieve a slight shimmer effect.


Although, I use 140 pound paper, I added
 fun foam to my to my embossed background.


Lastly, I pulled out one of my
 Papertrey stamp sets and die to create
 my outside greeting. I'm almost certain,
 any friend would love to be the recipient
 of this lovely card.
 

As always,  thanks for stopping by The Peddler's Gallery. Be sure to leave a comment to let me know what you think about today's card or to let me know you are still around. Peace & Blessings...

Wednesday, March 15, 2017

Fantastic@Fifty

Happy Hellos Everyone:


I hope all of my East Coast neighbors have shoveled their way out of the icy snow. I wanted to share some invitations I was asked to create for a 50th birthday celebration. Just in case some of you are wondering, I had no influence on the color selection which is lavender, black, and silver. [Smile] I can also say, "I did not have an issue with it either. Ironically, I know of another person that will turn 50 this fall and he select the same colors.


Take a look and please feel free to share your thoughts.


It maybe difficult to see looking at the pattern paper; however, I cut each invitation on an angel. Adhered, the two front pieces and the bottom together. I attached the information card to the lavender embossed paper and slid it into the invitational fold. I polished the invitation off with lavender tool and enhanced it with a clear rhinestone.

As always, thanks for stopping by The Peddler's Gallery and come back real soon.


Related Posts Plugin for WordPress, Blogger...